Salmon is a tiny diva. It goes from “silky, juicy, restaurant level magic” to “why does this taste like I baked a flip flop?” in what feels like 30 seconds.
And the worst part? Most of us overcook it because we’re waiting for it to look completely done in the pan… not realizing it’s still cooking after you pull it off the heat. (Carryover heat is rude like that.)
So here’s what I do: I use timing to know when to start checking, then I use a couple of simple doneness tests to decide when to stop cooking. No fancy gadgets required unless you like gadgets, in which case, live your truth.
Let’s get the safety stuff out of the way first, then we’ll get into the “how to nail it every time” part.
First: What Temperature Is “Safe” for Salmon?
Nobody wants dinner with a side of anxiety.
- For most healthy adults: salmon at about 125°F (medium rare) is generally considered safe and it’s the sweet spot for tender, juicy texture. The center may be just barely translucent. This is also how restaurants get that “why is theirs always better?” effect.
- If you’re cooking for someone pregnant, very young kids, older adults, or anyone immunocompromised: skip the vibes based doneness checks and either use a thermometer or cook it fully opaque to 145°F (USDA guideline).
Safety first. Fancy later.
The Two Visual Clues I Trust (And One I Ignore)
1) Opacity beats “pink”
Here’s a myth I’d like to gently escort out the door: “Pink means undercooked.” Nope. Salmon stays pink because of natural pigment (astaxanthin). Pink is not the problem. Translucent is the problem.
- Raw salmon: glossy, darker, kind of see through.
- As it cooks: it turns opaque from the outside in.
What you’re looking for is the look, not the color cues for doneness:
- Translucent = like a window
- Opaque = like a painted wall
2) Albumin (the white stuff) is a warning light
Those little white beads that show up on the surface? That’s albumin, a protein that squeezes out as the fish firms up.
- A few small beads = you’re getting close.
- Big white puddles = heat was too high and/or you’re pushing past your ideal.
Is albumin the end of the world? No. Is it your salmon waving a tiny white flag? Yes.
The Five Doneness Tests I Use (Pick 1-2 and Stop Overthinking)
Timing tells you when to check. These tests tell you when to pull it.
1) The Opacity Test (aka “Use Your Eyeballs”)
Check the thickest part.
- Medium rare: you might see a thin, faint translucent line in the very center.
- Medium/well: fully opaque all the way through no glossy/translucent spots.
If you’re cooking to 145°F (higher risk eaters), you want fully opaque.
2) The Side “Progress Bar” Test (my favorite for pan searing)
When salmon cooks skin side down, the side of the fillet shows a gradient: opaque on the bottom, raw on top.
- Watch the opaque band climb up the side like a little loading bar.
- When it’s about halfway, I usually flip (if I’m flipping).
- When it’s mostly opaque with a whisper of translucence in the middle, you’re right in that juicy zone.
This one is weirdly satisfying, like watching a pot boil but actually useful.
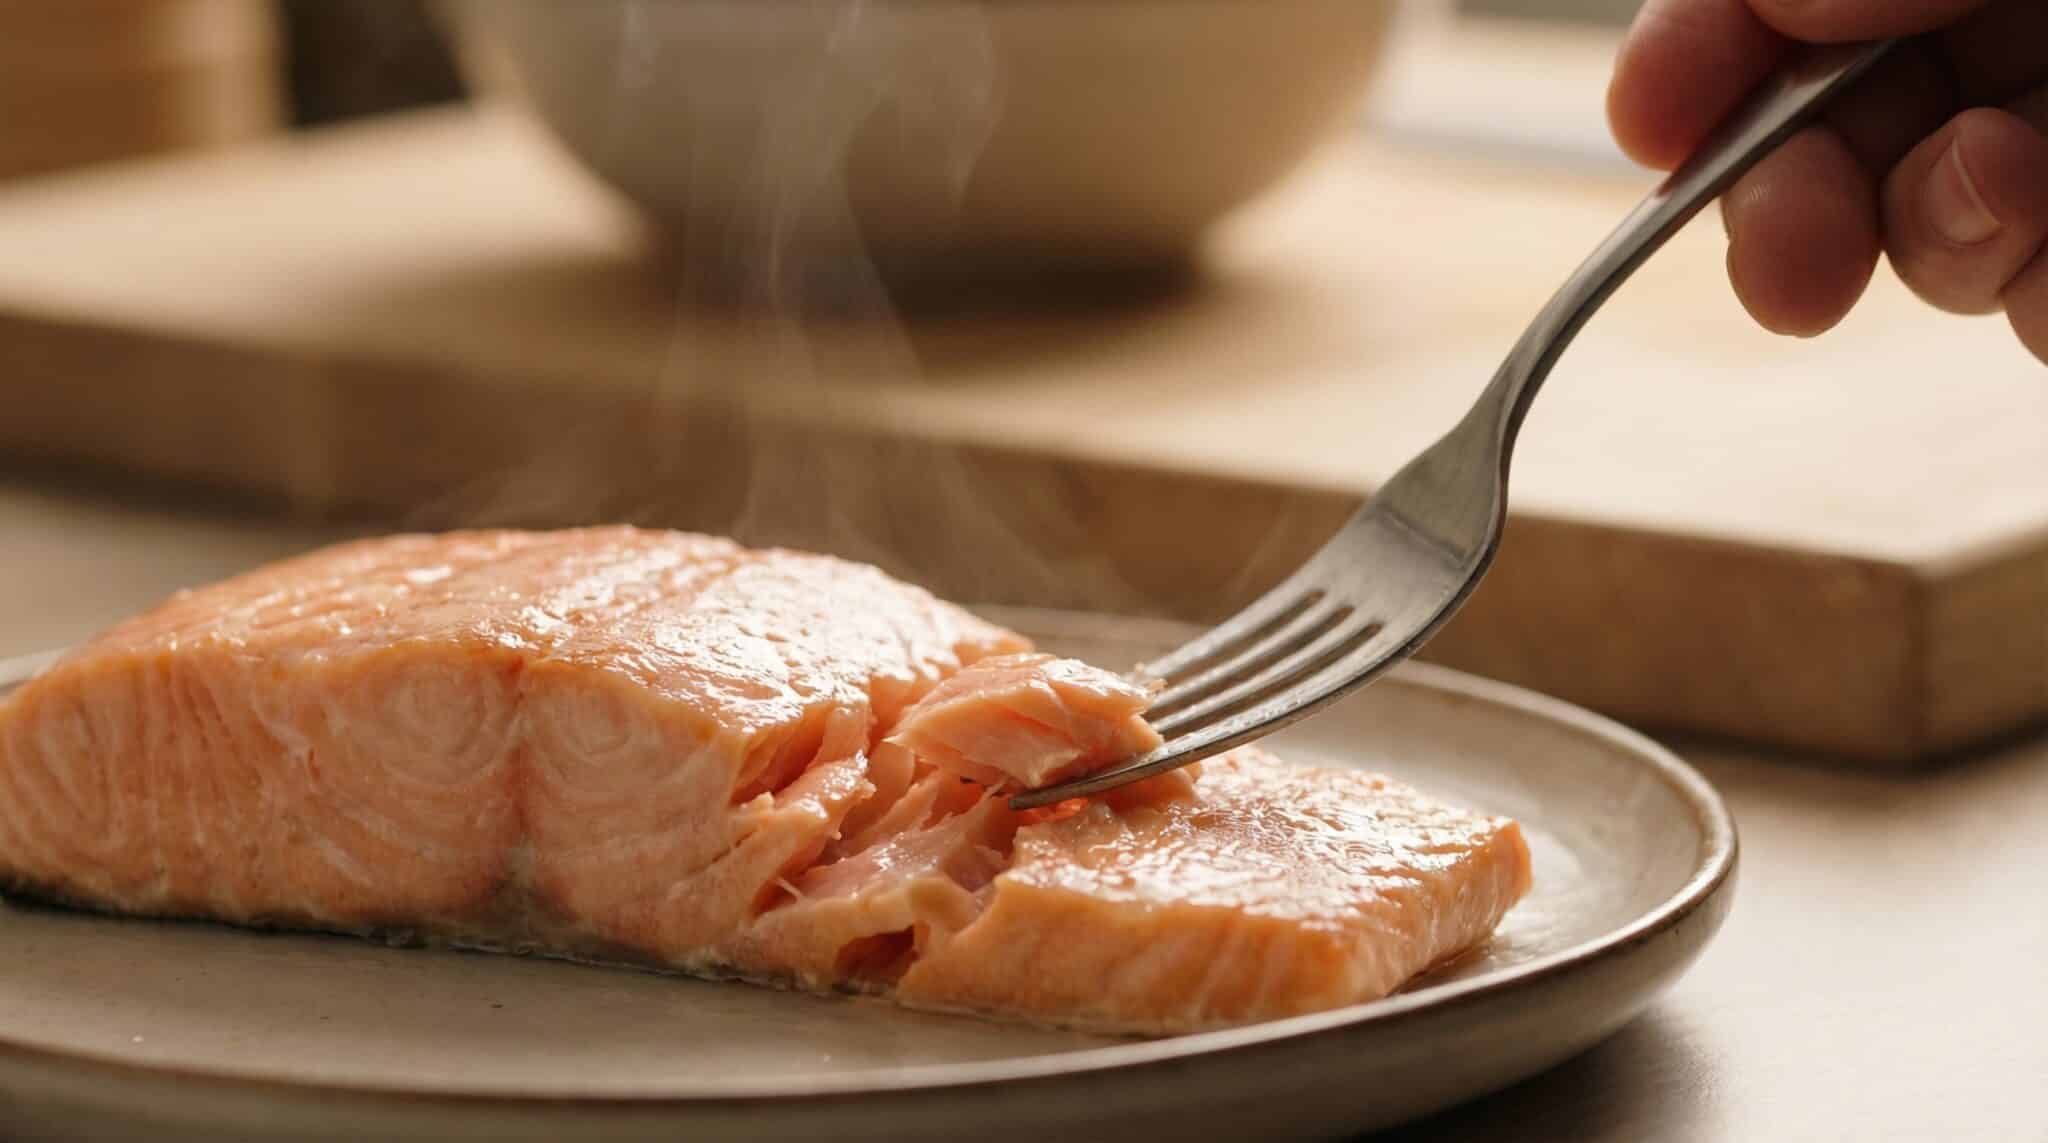
3) The Flake Test (use it sparingly salmon isn’t a pincushion)
Grab a fork. Go into the thickest part at a slight angle and give a gentle twist.
- Ready: it separates into clean, moist layers with just a little resistance.
- Not ready: it feels gummy and fights you.
- Overcooked: it crumbles dry and sad.
Important note from someone who has poked one fillet into submission: don’t flake test every 45 seconds. Every stab lets moisture escape. (Ask me how I learned this. Actually don’t. I’m still emotional.)
4) The Touch Test (yes, your face is involved)
Gently press the thickest part.
- Too raw: squishy like your cheek
- Perfect: firm but still springy like your chin
- Overcooked: firm like your forehead (aka “this could bounce a quarter”)
This works best on fillets under about 1.5 inches thick. On a thick piece, the outside can feel perfect while the center is still doing its own raw little thing.
5) The Metal Probe + Lip Test (sounds unhinged, works brilliantly)
This is my go to when:
- it’s glazed/dark so I can’t see opacity,
- I’m grilling at dusk,
- or dinner chaos has fully taken over.
Stick a thin knife tip or skewer into the center for 5 seconds, pull it out, then touch the metal to your lower lip.
- Cold/lukewarm: not done
- Warm (like bathwater): done
- Hot: you overshot
Your lip is sensitive. It’s like a tiny built in thermometer you already own.
Timing Cheat Sheet (So You Know When to Start Checking)
These times are for a 1 inch fillet, starting cold-ish (straight from the fridge), with your pan/grill fully preheated, aiming for medium rare to medium.
- Pan seared (medium high): 8-10 minutes total (start checking around 6)
- Baked at 400°F: 12-15 minutes (start checking around 10)
- Grilled over direct heat: 8-12 minutes (start checking around 6)
- Poached (gentle simmer): 5-8 minutes (start checking around 5)
Two things that matter more than people want them to:
- Thickness changes everything. Add roughly 3-4 minutes for every extra ½ inch.
- Fridge cold salmon cooks unevenly. If you can, let it sit out 15 minutes before cooking. It’s a small step that makes you look like you know what you’re doing.
The Secret Move: Pull It Early, Then Rest It (I Beg You)
This is the part most people skip and then act shocked when the salmon is dry.
Pull your salmon off the heat when it looks almost done. Salmon will typically climb about 5°F from carryover heat after you remove it so the pull temp for juiciness stays lower.
Here’s what I do:
- Take it off the heat when there’s still the faintest translucent line in the center (if you’re cooking for healthy adults and aiming medium rare/medium).
- Rest 3-5 minutes, loosely tented with foil.
- Walk away. Do not “just check it real quick” twelve times.
During the rest, the center finishes cooking and the juices settle back in instead of flooding your plate like a tiny fish tragedy.
Repeat after me: Don’t cook salmon to done. Cook it to almost done.
Quick Note on Wild Salmon (The Lean, Sporty Cousin)
Wild salmon is delicious… and also dramatically easier to overcook because it’s leaner than farmed.
My rule of thumb:
- Cut your cooking time by about 15-20%.
- Trust firmness and flaking more than color, because wild salmon can stay pretty pink even when it’s fully cooked.
If you’ve ever thought, “Why does wild salmon go dry so fast?” it’s not you. It’s the lack of fat. (Okay, sometimes it’s also us.)
Troubleshooting: The Three Most Common Salmon “Why Did This Happen?” Moments
“It’s perfect outside but raw in the middle”
Heat was too high and you basically seared the outside into lying to you.
Fix:
- Lower the heat
- Cook a little longer
- Don’t start with ice cold salmon
“It’s dry all the way through”
You cooked it until it looked done in the pan, not accounting for carryover.
Fix:
- Pull it earlier (slightly under)
- Rest it 3-5 minutes
- Consider aiming for 125°F if you’re in the “healthy adult” category
“The edges curled up like a weird fish canoe”
That’s usually the skin tightening faster than the flesh.
Fix:
- Score the skin with a couple shallow cuts before cooking
- Or use slightly lower heat so it doesn’t seize up immediately
My Personal “Do This and You’ll Be Fine” Routine
If you want the simplest plan without memorizing five tests:
- Use timing to know when you’re close.
- Look for mostly opaque with a tiny translucent center (if not cooking to 145°F).
- Do one confirmation test: flake or touch or metal probe.
- Pull it. Rest it.
- Pretend you’re naturally gifted at salmon. (You are now.)
Now go pull your salmon a little early and let carryover heat do the heavy lifting like the unsung hero it is.